Lemon & Poppy Seed Loaf Cake with Cream Cheese Icing

Zesty Lemon & Poppy Seed ‘Bake in the Box’ Loaf Cake with a Lemon Cream Cheese Icing. This scrumptiously easy loaf cake by Dr. Oetker is perfect for a last minute pudding or an emergency sweet fix.

Lemon & poppy seed loaf cake

Dr. Oetker sent me over their three new ‘Bake in the Box’ loaf cake mixes, Double Chocolate, Lemon & Poppy Seed and Banana & Choc Chip. I absolutely love the concept of having no washing up, you simply add the sachet contents and milk into the cardboard container, mix it up and bake in the box.

I decided to share with you the Lemon & Poppy Seed Loaf Cake and how you can easily dress up these box loaves for the wow factor, cheaply and with no special kitchen equipment. I did my usual thing and gave it a cheesy addition for extra flavour and texture.

The last time I made a box cake was over six years ago and I honestly can’t remember what it tasted like. Sceptical of how good it was going to be, I was delighted to be met by a light and fluffy sponge that tasted like actual lemons. The soft cheese icing I made to go with it added a depth of flavour that really brought out the intensity of the cake.

Now I know box or packet mixes aren’t for everyone, but these are perfect for storing in your cupboard for emergency cake fixes or for aspiring bakers who don’t have all the gear. Dr. Oetker’s mission with this new range is to make home baking available to everyone.

I have built up my baking utensils over the last three years and I often forget that not everyone has a whisk let alone a stand mixer. All you need to make this cake is very basic kitchen items such as, a fork, sharp knife and wire cooling rack. For the cream cheese icing I paired with it (you know I couldn’t not add a cheesy twist), I used a cereal bowl and a piping bag, but you can use a spoon to get the same effect.

Whether you’re a university student baking on a budget or saving up to build your bakeware collection, try out this deliciously moist Lemon & Poppy Seed Loaf Cake recipe with an added punch of citrus from the Cream Cheese Icing.

Ingredients 

Loaf Cake

Cream Cheese Icing

  • Juice of one lemon
  • 100 grams of soft cheese
  • 75 grams of icing sugar

Method

Step 1: Preheat oven to 190c / 170c fan / Gas mark 5. Next, rip open the box and empty the contents of the sachet directly into the box.

Step 2: Pour the milk into the box, use a fork to stir together until smooth, making sure there are no pesky lumps left. Pop the box straight into the oven for 10 minutes.

Step 3: Remove from the oven and slice a 1cm deep line lengthways through the centre of the cake with a sharp knife. Place the cake back in the oven for 20-25 minutes *or until an inserted skewer comes out clean.

Step 4: Once cool, run a sharp knife between the cake and the sides of the box, then unfold the corner flaps and fold down sides. Run a knife between the base of the cake and the box to remove the cake.

Step 5: Combine the lemon juice, icing sugar and cream cheese in a mixing bowl, stir until the lumps have gone. Pour into a piping bag, snip of the end and drizzle all over the cake. Finish with a garnish of fresh lemons and enjoy.

lemon and poppy seed loaf cake

Custard Cream Cheesecake made with real custard

Custard Cream Cheesecake

A silky No-Bake Custard Cheesecake, with a buttery Custard Cream base that’s topped with raspberries, custard and more of Britain’s (arguably) favourite biscuit! This Custard Cream Cheesecake is the perfect showstopper for a quintessentially British tea party.

Custard Cream Cheesecake Slice drizzled in custard and topped with raspberries & a  custard cream.png

HOST A #WORLDTEAPARTY FOR SPANA

Spana, a charity that provides free veterinary care to working animals around the world, hosts an annual summer #WorldTeaParty fundraiser for their incredible cause. Last year, I created a simple Coconut & White Chocolate Cheesecake to inspire their supporters to get no-baking!

I was delighted when Spana reached out asking me to create another cheesy recipe for this year’s campaign, which takes place on Saturday 8th July. Raising money for these hard working animals is not limited to the 8th July, if you decide to host your own event, you can download a free world tea party pack. It includes fun activities, invites and recipe cards to make your tea party extra special!

I decided to develop another easy no-bake cheesecake, one that was sure to get us native tea drinkers splashing the cash. This Custard Cream Cheesecake is the perfect twist on a classic biscuit for a traditional British tea party.  You will need a sheet tray, a lined 8 inch loose bottom tin, a spatula, a food processor, a whisk of some sort, two piping bag and a 1/2cm round piping nozzle.

Ingredients

For base:

  • 300 grams of custard creams
  • 125 grams of butter, melted

For filling:

  • 550 grams of soft/cream cheese, chilled
  • 100 grams of icing sugar
  • 1 tsp of vanilla
  • 250 grams of custard
  • 400 ml of double cream, chilled

For Decoration:

  • 50 grams of raspberries
  • 100 grams of custard creams
  • 50 grams of white chocolate
  • 75 grams of custard
  • 25 grams of icing sugar
  • 200ml of double cream

Method

Step 1: In a food processor, blitz the custard creams into a fine crumb. Next pour the melted butter into the food processor and blitz again until well combined. Tip the buttery custard creams into a lined tin. Using a teaspoon, pack the biscuits down into an even layer. Place the tin in the fridge whilst you make the custard cheesecake filling.

Step 2: In a mixer, whisk together the soft cheese, icing sugar and vanilla on a medium low speed. Then add the custard and mix on a medium speed. Finally add the double cream, and whisk on a medium high speed until the custard cheesecake mixture is thick enough to hold itself.

Step 3: Scoop the custard cheesecake filling into the tin, using a spatula to level out the top. Pop in the fridge for 5 hours or leave overnight to set.

IMG_1216

Step 4: Gently melt white chocolate over a double boiler, once completely melted pour over a sheet tray lined with crinkled, flatterned tin foil. Use a spatula to spread out to an even thickness, place in the fridge until set.

IMG_1230

Step 5: Once the cheesecake is set, pop it out of the tin onto a plate and place in the fridge whilst you make the topping. Pour the double cream, custard and icing sugar into a mixer, on medium speed whip until thick enough to hold its shape. Scoop the custard cream into a piping bag with a round tip, and pipe all round the top of the cheesecake.

IMG_1231

Step 6:  Place the custard creams around the top of the cheesecake, with a handful of raspberries. Remove the white chocolate from the fridge (as long as it’s set), break into small shards and place around the cheesecake. If you have any custard left, pour it into a piping bag, and pipe a few drips around the cake.

Custard Cream Cheesecake made with custard & custard cream biscuits, decorated with raspberries

If you make this cheesecake make sure you tag me in your creations

Twitter | Instagram | Facebook | Pinterest

You may also like:

Jammie Dodger Cheesecake

Vanilla and raspberry ripple cheesecake with a Jammie dodger biscuit base

GIVEAWAY – Premium Membership to Paul Bradford Sugarcraft School

Win a Premium Membership to Paul Bradford’s Online Sugarcraft School, worth over £95, by simply retweeting my pinned tweet and following both @biscuitbases and @Designer_Cakes on Twitter before June 7th 2017!!! 

IMG_1871.JPG

I started baking regularly about two years ago, and over that time I’ve slowly learnt new decorating techniques. However, you will notice I have a distinct style that doesn’t veer far from piping, chocolate drips and strategically piling edible decorations. Although I have dabbled in fondant and sugar work, I have never properly advanced my skills in the somewhat daunting tasks.

Luckily there are a number of resources online, like the Paul Bradford Sugarcraft School, that make learning these skills enjoyable with step by step tutorials. Whether you’re a beginner wanting to learn how to cover a cake board or looking to perfect your technique in sugar craft, the expertise from the Paul Bradford Sugarcraft School are made available from the comforts of your kitchen!

Paul Bradford started his Sugarcraft School in 2011, now his online courses comprise of the mastery of 44 world class tutors from across the globe! Learn how to make a classic fruit cake with Shelia Jones, turn it into a showstopper with Raewyn Read, take the perfect photo of your creation with Greg Bell and finally get your bake on the first page of Google with Mark Boyd!

The team at the Paul Bradford Sugarcraft School have given me the opportunity to award one of you a year’s premium online membership and two runners up with a 6 month premium online membership! Head to my Twitter @biscuitbases and follow the instructions of my pinned tweet to be in for a chance to win!

Premium Membership to Paul Bradford Sugarcraft School includes:

  • Over 150 Free Lessons
  • Step by Step video tutorials for all levels
  • Tuition from Paul Bradford
  • 308 Cake Decorating Courses
  • New detailed course every week
  • Access to private PBSS Members Facebook Group
  • 15% discount on your first Cake-Stuff.com order

IMG_1874.PNG


Althorp Food & Drink Festival Review

When my mum and I realised neither of us had plans last Saturday, we organised a boozy brunch at an undecided location. Due to my boyfriend studying for his final year exams I didn’t have a Saturday filled with adventure (*watching Line of Duty back to back) and my mum was not being the socialite she usually is on the weekend.

Our wish for a Prosecco filled destination was Fisher&Paykel’s command. An email late last week landed in my inbox inviting me and a plus one to a Food & Booze festival a mere 30 minutes away from my humble abode.

We hadn’t envisioned our girly day out would land us in the picturesque grounds of Althorp House, eating & drinking locally produced products. But we were very very pleased it did!

ALTHORP FOOD & DRINK STORY

Surprisingly we didn’t head straight for the Prosecco Van, we mutually agreed lining our stomach’s first was for the best as it was only 11am! We tactically decided to share a small portion of paella, allowing ourselves to save room for other delights we were bound to find on our mooch around the stalls.

On our route to the Fizz76 Van we made a slight detour around one of the inside marquees, full of independent stalls selling goods from Northamptonshire & local counties. We sampled lots of goodies where we fibbed, “Oh yes will be back later to buy some”. However, I did splash out on some rather delicious Macarons from Maison des Macarons.

When the clock struck 12 we were stood sipping Prosecco, with a dash of limoncello for me & a drop of cassis for my mum, at the cute Fizz 76 van. Then we carried on our venture around the festival a little more frivolously.

IMG_0067.JPG

TIPSY BECKY’S ALTHORP HAUL

The Biscuiter:

The alcohol munchies kicked in after my glass of bubbles and I let loose in the second indoor marquee. As soon as I walked in the enterance of the tent I spotted a viral Instagram baking trend, Cactus Macarons 🌵. My friend absolutely adores everything green, especially cacti, so I couldn’t not pick one up for her! She has now scanned The Biscuiter’s website and wants to buy everything.

Cacti Macarons

Beki’s Brownies:

Next I spotted Beki’s Brownies, who I had seen on Althorp Food & Drink Festival’s Twitter the day before! She makes incredible flavour combinations that I had never even imagined in a brownie, for example rhubarb & custard, as well as your classics, like Oreo Brownies which I opted for. I also picked up a White Choclate & Raspberry Brownie for my Step Dad because I’m nice like that 💁🏻

Beki's Brownies

The Lotus Bakery:

I then purchased a sausage roll from The Lotus Bakery because I got a bit peckish. Clearly drunk Becky arrived because she took a photo of all the beautiful cakes on this stall but not one of the sausage rolls 😂. I have gotten in touch with drunk Becky since and she said she’d love another one if I was offering.

The Wonder Kitchen:

We spotted the pink cupcake van at the beginning of the day, and once a little tipsy, I demanded that we went back to buy a box of the gorgeous cupcakes (after my photo shoot with the van.) They were delicious, but nobody can beat my mum’s!

They really picked a glorious weekend to host such an event, although a tad drizzly at times the weather was near perfect for an outdoor festival in May. I would like to thank Fisher&Paykel for inviting me to the festival to blog about my experience. Of course all opinions expressed are all mine, and not that of the brand’s!

Fluffy American Pancakes with vanilla cheesecake

American Style Pancakes ft. Cheesecake

These fluffy American Pancakes sandwiched together with a sweet Vanilla Cheesecake, served with fresh Raspberries, Strawberries and Bananas are the ultimate thick pancake recipe with a deliciously cheesy twist that’s perfect for Pancake Day!

Light and fluffy Stacked American Pancakes served with fresh fruit & Vanilla Cheesecake

Ahh pancake day, the one day of the year it’s acceptable to have a stack of sugar for breakfast, lunch and dinner! I hold the family record of eating eight in one sitting (yes I was a chubby kid!) Pancakes have been a Saturday breakfast treat since I was a child, the only way my gran would coerce me out of bed at the crack of dawn was with the sweet promise of crepes.

For the past month or so, my boyfriend has been using the same trick, “Come walk the dogs with me and I’ll cook you pancakes.” Works like a charm every time (well maybe not every time 😉)

As we’ve been living off crepes most weekends recently I had this cheesecake crepe recipe all figured out! That was until my boyfriend took me for brunch at The Book Club in London which is renowned for its American Pancakes. I’ve never been a big fan of thick Pancakes but when you’re eating at a cafe known for its pillowy pancake you’ve got to indulge them.

The Book Club Pancakes

The Book Club Pancakes

AND BOY WAS I PLEASED I DID! Now all I want is big, thick, fluffy pancakes dripping in naughty toppings and fresh fruit rather than your plain Jane sugar and lemon crepes! So this weekend I’ve lived off American Pancakes and added a very naughty cheesy twist that I couldn’t wait to share with you!

To make these ultra naughty pancakes you will need, two mixing bowls, a whisk, a ladle and a flipper (spatula).

Ingredients 

For American Pancakes:

  • 300 ml of milk
  • 2 eggs
  • 200 grams of self-raising flour, sieved
  • 1 1/2 tsp of baking powder
  • 1 tsp of sugar
  • 1 tsp of vanilla

For topping:

  • chopped banana
  • chopped strawberries
  • handful of raspberries
  • 200 grams of soft cheese, chilled
  • 5 tbsp of icing sugar
  • 1 tsp of vanilla
  • 4 fl oz of double cream, chilled

Method

Step 1: Add all the pancake ingredients into a large mixing bowl, and whisk until smooth. Pour a teaspoon of oil into a frying pan and place over a medium heat. When the pan is hot pour half a ladle of the pancake batter into the frying pan. Cook until bubbles start to form, then flip the pancake. Cook until golden brown on both sides!  Repeat until all the mix has gone. Leave to cool whilst you make the cheesecake topping.

Step 2: In a clean mixing bowl whisk together the soft cheese, icing sugar and vanilla. Next pour in the chilled double cream and whip until thick enough to hold its shape.

Step 3: Top each pancake with a good helping of the vanilla cheesecake mix and fresh fruit then enjoy!

Cheesecake PancakesOLYMPUS DIGITAL CAMERA

Follow me on:

Twitter | Instagram | Facebook | Pinterest

Prosecco Cheesecake

A beautifully simple No-Bake Vanilla Cheesecake riddled with Prosecco soaked Strawberries & Raspberries, topped with Vanilla Whipped Cream & edible pearls. Whether you’re celebrating Galentine’s Day with your Girl Band or Valentine’s with your one true love, make sure you share a slice of Prosecco Cheesecake! 

Strawberry & Raspberry Prosecco Cheesecake

You can thank my boyfriend for this genius creation. I was struggling to think of the perfect cheesecake for my mum’s 50th birthday, when he suggested I made her favourite tipple into a creamy no-bake!

Last summer we were both obsessed with gummy bears soaked in Prosecco (absolutely boozalicious, I highly recommend you make some), which gave me the idea to soak the berries. For the “fizz” I added a genourous helping of popping candy to the buttery biscuit base (did I just make you think of Gregg Wallace?) which you can find in the baking section in Tesco or on amazon!

Show your nearest and dearest how much you love them this Valentine’s, by creating this simple but beautiful Prosecco Cheesecake. You will need, an 8 inch tin, two piping bags, a mixer / whisk, a Wilton 1m star nozzle and a spatula.

Ingredients

For base:

  • 200 grams of digestive biscuits
  • 75 grams of unsalted butter, melted
  • 2 tbsp of popping candy

For filling:

  • 400 grams of soft/cream cheese, chilled
  • 175 grams of caster sugar
  • 1 tsp of vanilla
  • 175 grams of crème fraiche, chilled
  • 450 ml of double cream, chilled

For boozy fruit:

  • 200 grams of strawberries
  • 200 grams of raspberries
  • Bottle of prosecco

For decoration:

  • 200 ml of double cream, chilled
  • 1 tsp of vanilla
  • 1 tbsp of icing sugar
  • Pink pearl sprinkles
  • Pearl sprinkles
  • Pink sprinkles

Method

Step 1: 24 hours before you want to make the cheesecake, pour the Prosecco over the strawberries and raspberries in a large mixing bowl. Make sure the fruit is completely covered in the Prosecco. There will probs be a glass or two left over for you to drink. Pop cling film over the top of the bowl and place in the fridge for 24 hours.

Prosecco soaked raspberries & strawberries

Step 2: Place the digestives in a food processor and blitz until they resemble a fine crumb. Next pour in the melted butter, and give it another good wizz until thoroughly  combined. Tip in the popping candy & stir together using a spatula. Pour the buttery popping biscuit mix into a well lined loose bottom tin, using the back of a soup spoon to pack the biscuits down.

Step 3: Drain the fruit that has been soaked in Prosecco for 24 hours and place on kitchen roll. Pat the strawberries dry, using a dry piece of kitchen roll. If your strawberries are big cut them into thick slices, if they are small cut them in half. Place the inside of the strawberry against the tin. Put the tin in the fridge whilst you make the cheesecake filling.

Step 4: In a mixer, whisk together the soft cheese, caster sugar and vanilla on a medium speed. Then pour in the chilled creme fraiche and double cream, whisk on a medium-high speed until the mixture is thick enough to hold its shape.

Step 5: Scoop some of the cheesecake mix into a piping bag and pipe around all of strawberries. Then pour the drained raspberries into the rest of the cheesecake mix and fold together. Tip the filling into the tin, and level the top of the cheesecake using a spatula. Pop back in the fridge for 5 hours or overnight.

Step 6: Once the cheesecake has set, pour the double cream, vanilla and icing sugar into a mixer, on a medium speed whip the cream until it forms stiff peaks. Spoon the whipped cream into a piping bag with a Wilton 1m nozzle (or any star nozzle you own!). Pipe the cream in upward swirls around the cheesecake. Sprinkle your pink and pearl edible beads all over your piped cream (and probably the floor).

Keep up to date with me on:

Instagram | Twitter | Facebook | Pinterest

Raspberry Cheesecake Creme Brûlée

Creme Brûlée Cheesecake

Individual creamy No-Bake Raspberry and Vanilla Cheesecakes topped with Caramelised Sugar & Fresh Raspberries. A super quick Mini Creme Brûlée Cheesecake recipe perfect for a mid week treat!

Individual Raspberry Creme Brûlée Cheesecakes

My parents have jetted off to New Zealand for three weeks, which means I can’t justify making an entire cheesecake just for me! But I’ve still got cheesecake needs!

Me and my boyfriend have been obsessing over Creme Brûlée recently, something about the smell of burnt sugar really gets our taste buds going. They are the perfect individual pudding which gave me the idea of, Mini Creme Brûlée Cheesecakes! I swapped the usual thick vanilla custard filling for a thin buttery biscuit base topped with a creamy no-bake vanilla and raspberry cheesecake filling and finished it with the classic Creme Brûlée caramelised sugar top.

This recipe makes four small individual portions which is perfect for a small family or a treat for two depending on the size of your pots! I recycled glass ramekins that I’ve acquired from Gü Pots over the years (I knew they would come in handy one day!) You will also need a whisk, spatula, rolling pin and a blow torch.

Ingredients 

For base:

  • 75 grams of digestive biscuits
  • 25 grams of unsalted butter, melted

For filling:

  • 200 grams of soft/cream cheese, chilled
  • 5 tbsp of icing sugar
  • 1 tsp of vanilla
  • 4 fl oz of double cream, chilled
  • 8 raspberries

For decoration:

  • 4 tbsp of golden caster sugar
  • 8 raspberries

Method

Step 1: Place the digestives in a mixing bowl, using your weapon of choice (I opted for a rolling pin), bash the biscuits into a fine crumb. Pour in the melted butter and mix until well combined. Equally distribute the buttery biscuit mix among the four ramekins. Use a teaspoon to pack the biscuits down. Place the pots in the fridge whilst you make the cheesecake filling.

Step 2: Plop the cream cheese, icing sugar and vanilla into a clean mixing bowl, using a spatula beat together. Next pour in the chilled double cream, using either an electric or hand whisk, whip until thick. Remove the pots from the fridge and place two raspberries broken up into the pots. Then equally distribute the cheesey filling between the four pots. Place the cheesecakes in the fridge until you’re ready to serve them.

Step 3: Remove the cheesecakes from the fridge just before you want to serve them. Then sprinkle nearly a tablespoon of golden caster sugar on each of the cheesecakes. Using a kitchen blow torch, burn the sugar all over the top of the cheesecakes. Place a couple of raspberries on top, and serve.

Creme Brûlée Cheesecakes

Raspberry Creme Brûlée Cheesecake

Make sure you tag me in your photo’s I love seeing you recreate my recipes:

Twitter | Instagram | Facebook | Pinterest

Recipes you might also like:

Mini Biscoff Cheesecakes

Mini biscoff cookie butter cheesecakes topped with whipped cream

Raspberry & Brownie Cheesecake Squares

image

Toblerone Cheesecake

An indulgent No-Bake Milk Chocolate Toblerone Cheesecake, topped with Toblerone Triangles, Nougat and Salted Caramel. The perfect cheesecake recipe to use up your mound of Christmas chocolate.

Toblerone Chocolate cheesecake

If you can’t stand the sight of the new Toblerone bars or like me you received an excessive amount of chocolate at Christmas, then why not melt them down and turn it into a delicious cheesecake that you can share with friends.

As soon as I spotted the TWO Toblerones my mum put in mine and Spencer’s Santa sack, I immediately burrowed them away. I had planned to make a Toblerone Cheesecake over the Christmas period but didn’t have the time, but thought it would make the perfect blog post for “using up Christmas chocolate” (not sure anyone actually ever has leftover chocolate, I just purely wanted to make a Toblerone Cheesecake and thought this would be a good excuse 😂).

I was going to make my own nougat but I couldn’t find rice paper in my local Tesco or Waitrose. However, I did find Barrett’s Jumbo soft Raspbery & Vanilla flavoured Nougat in Tesco which was a steal at 59p. I decided to decorate this cheesecake in the same simple yet effective style as my No-Bake Maltesers Cheesecake recipe (throw loads of stuff on top and smother it in caramel 👀).

This Toblerone cheesecake is very easy to recreate, the only real skill you need is stacking for the decoration (this took me a couple of attempts to get a sturdy structure). You will need a lined six inch tin (or an 8 inch tin but it won’t be as deep), a mixing bowl, spatula, food processor, 1 piping bag, and a knife.

Ingredients

For base: 

  • 250 grams of chocolate digestives
  • 75 grams of unsalted butter, melted

For filling:

  • 400 grams of soft / cream cheese, room temperature
  • 175 grams of Toblerone, melted
  • 125 grams of milk chocolate, melted
  • 50 grams of icing sugar
  • 300ml double cream, chilled

For decoration:

Method

Step 1: Pop the chocolate biscuits in a food processor and give them a good wizz until they resemble a fine crumb. Then add the melted butter and give them another wizz. Pour the buttery biscuit mix into your lined tin, using a soup spoon press the biscuits into an even layer. Place the tin in the fridge whilst you make the cheesecake filling.

Step 2: Melt the Toblerone and milk chocolate gently over a double boiler, once completely melted remove from the heat and set aside. In a large mixing bowl using a spatula, beat the soft cheese and icing sugar together until it is completely combined. Then add the melted chocolate, and mix together quickly, using the spatula again.

Step 3: Pour the double cream into the chocolate cheesey mix, using the spatula to stir together until it thickens. If it doesn’t seem to be thickening use an electric whisk to help it along. Remove the tin from the fridge, pour in the Toblerone cheesecake filling, use a spatula to level out the top. Pop the tin back into the fridge for 4 hours or overnight.

Step 4: Once the cheesecake has set, remove it from the tin and place on a plate. Chop the Toblerone into its triangles and cut the nougat into pink and white squares. Pile the on top of the cheesecake. Place the carnations caramel and salt in a heat proof bowl and microwave for 10 seconds, pour it into a piping bag, snip off the end and drizzle all over the cheesecake.

Voila, a super simple No-Bake Toblerone Cheesecake drizzled in caramel sauce! Remember to tag me on social media if you recreate and follow me on the following platforms for more delicious goods:

Twitter | Instagram | Facebook | Pinterest

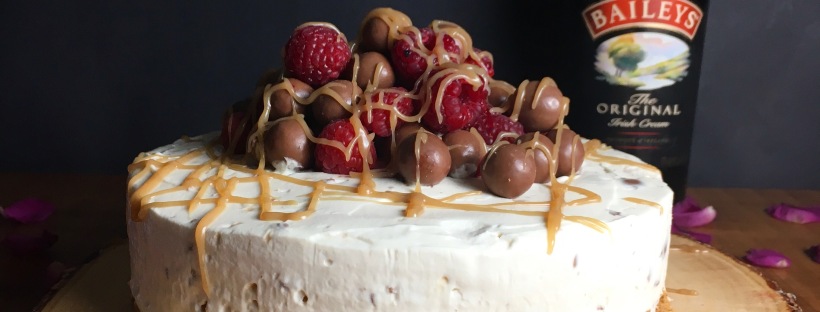
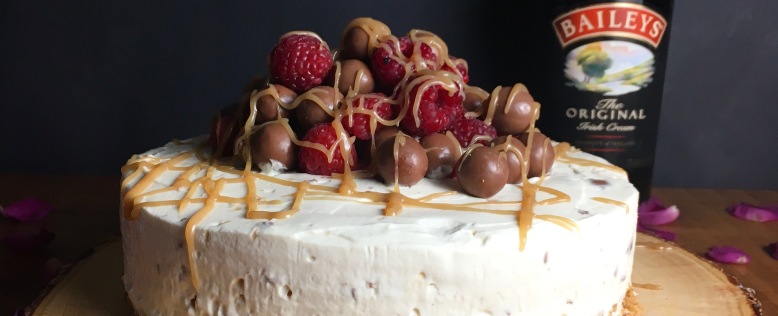
Baileys cheesecake with Maltesers and raspberries

Maltesers & Baileys Cheesecake

A creamy No-Bake Baileys Cheesecake riddled with Maltesers, topped with fresh Raspberries, more Maltesers and a drizzle of Caramel for good measure. This Baileys and Maltesers Cheesecake is the perfect Christmas Party Showstopper.

No-bake Baileys Cheesecake riddled with Maltesers, and finished with a good helping of more Maltesers, Raspberries and a drizzle of caramel.

The second cheesecake in my series of ‘Christmas Centre Piece Cheesecakes’ had to be a Baileys Cheesecake! For me Baileys is the ultimate Christmas drink, as soon as you see the bottle in the fridge you know Christmas will be shortly following.

Last year, I made several Baileys Cheesecakes over the festive period, my first having a little too much Baileys in, which resulted in a cheesey Baileys puddle. You’ll be happy to know that I have successfully got the balance right since 😂.

This year I wanted to make something a bit different, but still wanted that naughty creamy whiskey punch. I don’t know when I had the light bulb moment of adding Maltesers and raspberries to the filling and for decoration, but I do know its a match made in heaven.

I’ve made this Cheesecake twice in the past 2 weeks and I’ve already been asked if I will make another one for Christmas Eve (no rest for the wicked). The most recent one I made converted two baileys haters, so you know it will be loved by all at a festive gathering.

For this recipe I use either my 6inch loose bottom tin, which makes the cheesecake deeper (as seen in the photo below), or my 8inch loose bottom tin, not quite as towering but easier for a bigger gathering and still as impressive (photo above.) You will also need a piping bag, whisk/mixer, rolling pin (or other heavy item to bash the Maltesers) and food processor.

No bake Baileys cheesecake with Maltesers and raspberries

Ingredients

For base:

  • 300 grams of chocolate digestives, crushed
  • 90 grams of unsalted butter, melted

For filling:

  • 400 grams of soft / cream cheese, chilled
  • 100 grams of icing sugar
  • 50 ml of baileys, chilled
  • 1 tsp of vanilla
  • 100 grams of crème fraiche, chilled
  • 300 ml of double cream, chilled
  • 195 grams of Maltesers, crushed

For decoration:

  • 1 tbsp of caramel
  • 50 grams raspberries
  • 121 grams of Maltesers

Method

Step 1: Normally I use a food processor to crush my biscuits, but my lovely assistant (boyfriend) is chief biscuit basher when he visits. His weapon of choice is a large zip lock bag and a rolling pin. He pops the digestives in the bag, zip locks it shut and gives them a good ol bash until the biscuits resemble a fine crumb. Then pours the biscuit crumb into a large mixing bowl and stirs in the melted butter. But my method is a lot quicker! Just pop the biscuit in the food processor give them a good wizz, add the butter and give it another good wizz and ta dah, no achey arm.

Step 2: Tip the buttery biscuit mix into a well lined loose bottom tin. Using the back of a soup spoon press the biscuits down into an even layer. Then pop the tin in the fridge whilst you make the Baileys & Maltesers filling.

Step 3: Pop the soft cheese, vanilla and icing sugar into a mixer. On a low speed, mix the ingredients together using the whisk attachment. Then add the baileys and whisk on a medium speed until combined. Pour in the creme fraiche and double cream, whisk on a medium-high speed until the cheesecake mixture thickens and holds its shape.

Step 4: Partially crush the Maltesers in a large mixing bowl using a rolling pin. I left a few still whole and the majority crushed into a fine Maltesers crumb. Remove the bowl from the mixer and pour the crushed Maltesers into the baileys cheesecake, using a spatula fold together. Remove the tin from the fridge and pour in the cheesecake filling. Use the spatula to level out the cheesecake to leave smooth finish. Place the tin in the fridge for five hours or over night.

Step 5: Remove the cheesecake from the tin and place on a plate. Pour the Maltesers and raspberries in a pile on top of the cheesecake. Pour the caramel into a piping bag and drizzle over the top of the cheesecake. Leave in the fridge until you’re ready to serve!

Baileys cheesecake with Maltesers and raspberries

Twitter | Instagram | Facebook | Pinterest

Cheesecake profiteroles topper with a white chocolate ganache

Cheesecake Profiteroles

Crisp, Golden Profiteroles filled with an easy No-bake Vanilla Cheesecake, topped with a delicious White Chocolate Ganache. Christmas is quickly approaching, so why not impress your family and friends with a cheesy twist on the ultimate sharing pud! 

Easy profiteroles filled with a delicious no-bake vanilla cheesecake topped with a white chocolate ganache

I cannot believe Christmas is in less than two weeks! This year I started my Christmas shopping in November, which is unheard of. In previous years I’ve been known to do it the week running up to the big day (even Christmas Eve – yes I was THAT person). However, times have changed and my Christmas present list now has 18 people on it. The pressure of buying for that amount of people has forced me to be organised.

Not only did I start my Christmas shopping early (so much less stress, I will hopefully remember that next year 😂) I also started testing Christmas Centre Piece Desserts in November too. I’ve made these Cheesecake Profiteroles using Paul Hollywood’s choux pastry recipe 4 times now and I think I’ve cracked it!

My top tip is to be super prepared before starting the choux pastry. I made sure I didn’t miss anything out during the quick process by having everything weighed and measured in separate bowls beforehand. To make this Cheesecake Profiteroles Centre Piece you will need, two baking trays, a medium and a small saucepan, wooden spoon, mixer/whisk, four piping bags and a 1/2cm round nozzle.

Ingredients

For choux pastry:

  • 65 grams of plain flour, sifted
  • pinch of salt
  • 50 grams of unsalted butter, diced
  • 2 large eggs, beaten
  • 120 ml of water

For cheesecake filling:

  • 400 grams of soft/cream cheese, chilled
  • 100 grams of icing sugar
  • 1tsp of vanilla
  • 100 grams of crème fraiche, chilled
  • 300 ml of double cream, chilled
  • pink food colouring

For white chocolate ganache:

  • 150 grams of white chocolate, finely chopped
  • 75ml of double cream
  • pink food colouring
  • 50 grams of white chocolate, melted – for decoration

Method

Step 1: Preheat the oven to 200C. With some extra butter grease two baking trays. Next sift the flour into a bowl and put to one side. Pour the water into a medium size pan with the salt and butter, heat on a low temperature until the butter has melted (don’t let it boil and begin to evaporate).

Step 2: Once the butter has completely melted, quickly bring the mixture to the boil & tip in all the flour. Remove the pan from the heat and beat vigorously with a wooden spoon until it makes a smooth heavy dough. (Try to avoid getting it all over the kitchen flour like a certain person 👀.)

Step 3: Put the pan back on a low heat and beat the dough for a minute with a wooden spoon. When it’s ready it should come away from the sides of the pan to make a smooth, glossy ball. Tip the dough into a large mixing bowl and leave until tepid (slightly warm but pretty much cold.)

IMG_5317.JPG

Step 4: Beat the eggs in a separate bowl until combined, then gradually beat them into the dough with a wooden spoon, beating well after every little addition (you might not need all the egg.) The dough is ready when it’s very shiny, paste like and falls from a spoon when lightly shaken.

img_5323

Step 5: Spoon the pastry into a piping bag with a 1/2cm circular nozzle or simply snip the end of the piping bag off and pipe 14-16 small buns on to the prepared greased trays. Then sprinkle the tray with a few drops of water (not the pastry) and bake in the oven for 15 mins. Then without opening the door drop the temperature to 170C and bake for a further 10 mins or until golden brown and crisp. Remove the tray from the oven make a small hole underneath each of the profiteroles and return to the oven for a further 5 mins. Remove from the oven and leave to cool on a wire rack.

Step 6: Once the profiteroles are completely cooled, place the soft cheese, icing sugar and vanilla into a mixer. Using a whisk attachment, mix on a low speed until completely combined. Add the pink food colouring (make it darker than the shade you want), mix again until the mixture is all pink. Then add the creme fraiche and double cream, whip until thick. Pop the mixture into a piping bag with the metal 1/2cm round nozzle. Pipe the mixture into each profiterole through the hole you made earlier.

Step 7: Make the ganache by finely chopping the white chocolate, then place it into a small bowl. Pour the cream into a small saucepan with a little bit of pink colouring, stirring occasionally, bring to the boil, as soon as it starts to boil remove it from the heat and pour over the white chocolate. Cover the bowl with a plate and leave for 5 mins. Then mix until all lumps of chocolate have melted. When the ganache is thick, pour it into a piping bag, and pipe it on top of the profiteroles. Melt left over white chocolate and drizzle on top. Stack straight away so they set into place.

Cheesecake profiteroles topper with a white chocolate ganache